Dutch Oven Cornish Hens with Crispy Potatoes & Gravy
 Jump to Recipe
There are few things I enjoy more than feasting on some amazing cuisine. Doubly so when it’s in a place that one might not ordinarily have such luxuries, like the middle of remote wilderness! While other people might resign to eating a sad, burnt hot dog cooked on a stick for dinner, I take much pleasure in cooking serious meals while spending time in the great outdoors.
Recipe Video
While camping solo in the National Forest for a week in May of 2019, I cooked and ate many outstanding meals, but perhaps none as succulent and satisfying as my Cornish game hens and crispy potatoes. I finally took the time to document the process, to share in all its delicious glory!
Baking chicken in a Dutch oven, like most Dutch oven baking, is not a purely “set it and forget it” operation. A Dutch oven needs very regular attention while doing its thing. The coals must be rearranged and replenished. The Dutch oven and lid must be rotated. And because baking temperatures and heat distribution aren’t exact, the food must be checked at certain times.
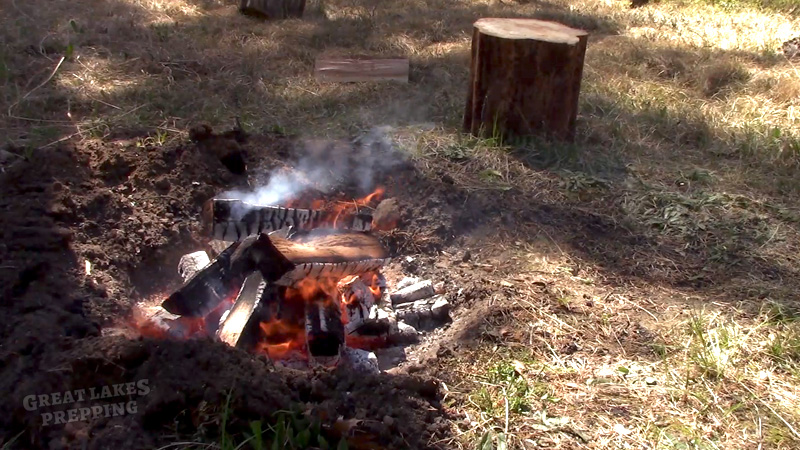
The campfire never really goes out during the waking hours of a camping trip. It’s easier to just keep it going than to restart every time I need heat for something. And with Dutch oven cooking, you need lots and lots of hot coals. The first order of business when arriving at our campsite is to dig the pit and get a fire going. By the time camp is set up, it’ll be time to cook something anyway! Also, the stage between getting the fire started and littering the area with all manner of tents, cooking, and other camping equipment is one of my favorite sights to behold.
I’ll share some photos and describe the process of creating this mouth-watering dish. You can also see the full video instructions and demonstration below. Or if you’d prefer, you can scroll directly to the recipe card.
If you’ve never baked food in a Dutch oven before, check out our Beginner’s Guide to Dutch Oven Baking before trying this recipe.
Cornish Hens
Why use Cornish hens instead of a regular chicken? There’s not any incredibly compelling reason. They taste pretty much the same to me. But the smaller hens cook faster and are a bit more tender. And two Cornish hens fit into a freezer (or cooler) better than one full chicken. Plus it’s just kind of neat that everybody gets their own entire bird. Everybody gets the same amount of legs, thighs, breasts, and crispy skin!
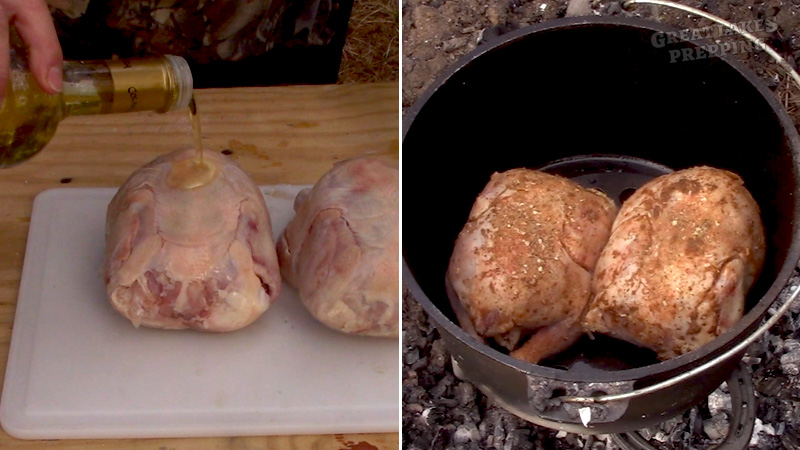
In concept, the baking process is no different than in a conventional oven. Oil the bird, season the bird, and bake the bird. Starting off with fully-thawed hens, I rub them down with olive oil. I don’t use so much oil that it’s dripping off, but I make sure to get some on every outer surface (under the wings, around the legs, etc).
Next comes the seasoning. I make my own seasoning blend out of paprika, seasoned salt, black pepper, thyme, onion powder, and garlic powder. You can use whatever seasonings you like, either homemade or store-bought. My blend is pretty heavy on paprika, which is quite mild in flavor, so I coat it on the hens pretty thoroughly. I love when the thick layer of spice forms somewhat of a crust on the crispy skin, but you have to be careful about overpowering the spice blend.
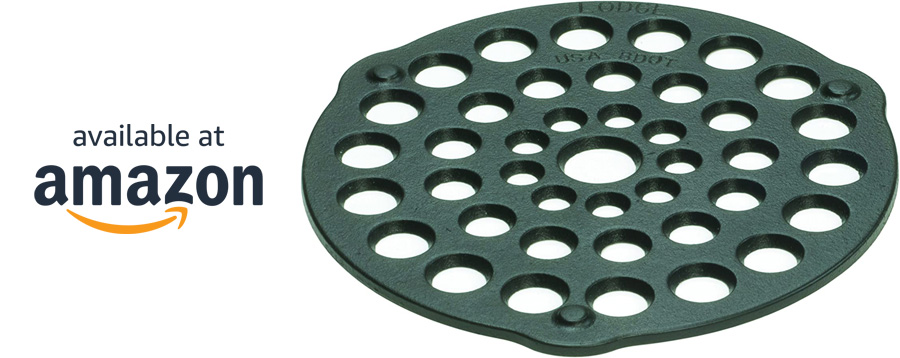
Once the Dutch oven is pre-heated (to somewhere around 350-375°F), it’s time to put in the hens. I highly recommend using a Dutch oven meat trivet. This is a cast iron “riser” that gets your meat up off the floor of the oven a little bit. This is very helpful to ensure that the bottom of your meat doesn’t get too much heat and begin frying (and inevitably burning).
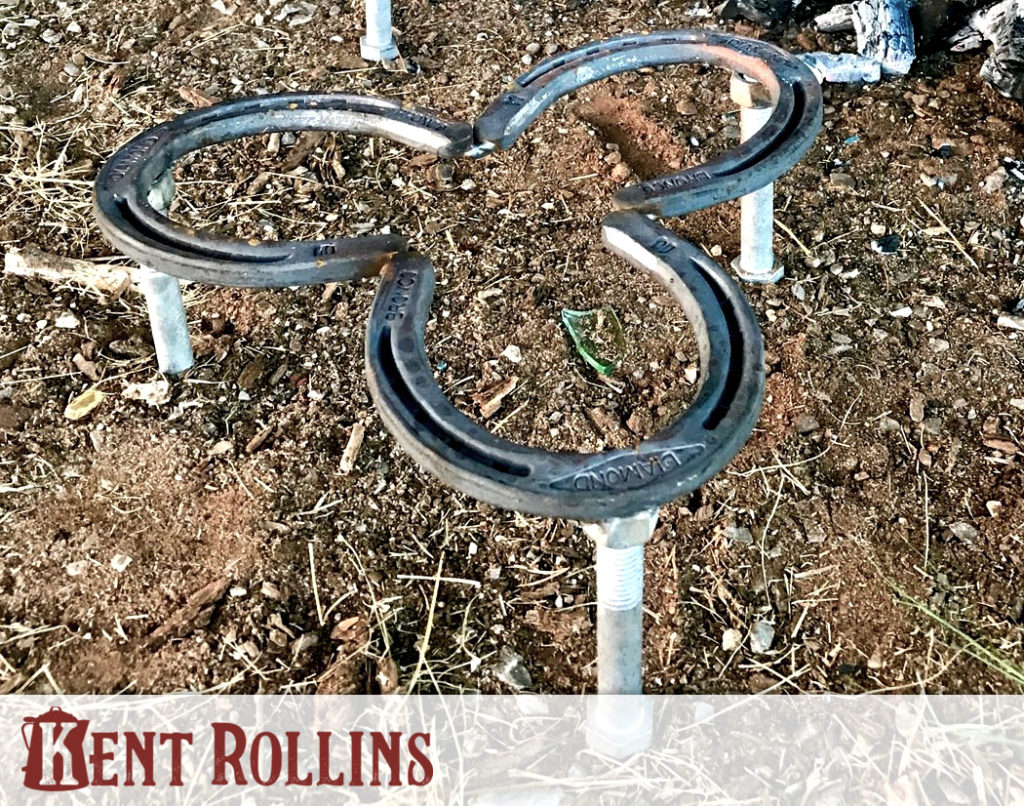
Note that a meat trivet or “roasting trivet” is different than the trivet on which the entire Dutch oven is set, to lift it up off the ground so coals can go under it (the one I use is made from horseshoes and can be found here).
Again: A roasting/meat trivet goes inside the Dutch oven, and a “Dutch oven” trivet goes beneath it. Similar names, very different functions.
Once the birds are in the oven, put the lid back on and check your coals. You’ll probably need to replenish with hot coals at this point. As always, be careful not to place too many directly beneath the oven.
Be sure to turn the Dutch oven 180 degrees and turn the lid 180 degrees every once in awhile to help with even heating from those coals. I generally do this at 15 minute intervals, regardless of what I’m baking.
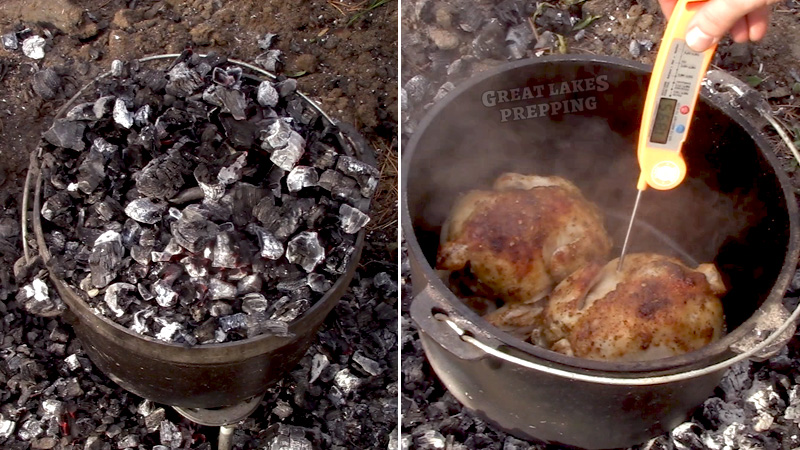
The baking process usually takes about 45 minutes for me. After around 35 minutes, you may want to check the hens with a meat thermometer. The size of your oven, the type of wood you’re burning, and the exact positioning of your coals can all affect cooking time. I prefer to check the internal meat temperature too early rather than too late. Once it’s burnt, it’s burnt. But you can always bake it a little longer if needed. The internal meat temperature of poultry needs to be at least 165°F. Obviously you don’t want to cook it well over that temperature because your chicken will end up dry and chewy. The goal with chicken temperatures is to hit 165°F without going much over.

When checking the temperature with your meat thermometer, it’s important to check a couple different areas of the bird. Especially because of the sometimes-uneven cooking you can get from a Dutch oven, you’ll need to make sure every area of the bird has reached 165°F. Stick the thermometer into the meatiest part of a thigh, a leg, and a breast. Once everything is at least 165°F, remove them from the Dutch oven as quickly as possible and let them rest for a few minutes while you make the gravy.
Crispy Baby Gold Potatoes
Since I’ve got about 40 minutes while the Cornish hens are baking, it’s the perfect time to make a great side dish. And what side dish goes better with roast chicken than potatoes? I could have thrown them in with the birds and made a “classic” roasted chicken and root vegetable dinner, but I’m not always in the mood for mushy potatoes. The first time I made these Cornish hens out in the forest, I paired it with my crispy golden potatoes. Since then, it’s become a “thing”. They go together so well, and at this point it’s nearly a matter of tradition. My brain has come to associate “Cornish hens” with “crispy potatoes”, and that’s why I joined all of these things into a single recipe instead of breaking it up into multiple posts. This is America and you can do whatever you want, but I implore you to try it “my way” the first time!
This side dish works best with baby gold potatoes, but fingerlings work fine as well. They just need to be rather small, and have light skin that will not get peeled. For two people, 10-12 baby golds does the trick. I start by getting a small pot of water boiling. To prepare the potatoes, all I do is cut them each in half. If you do use fingerlings, be sure to cut them in half long-ways.
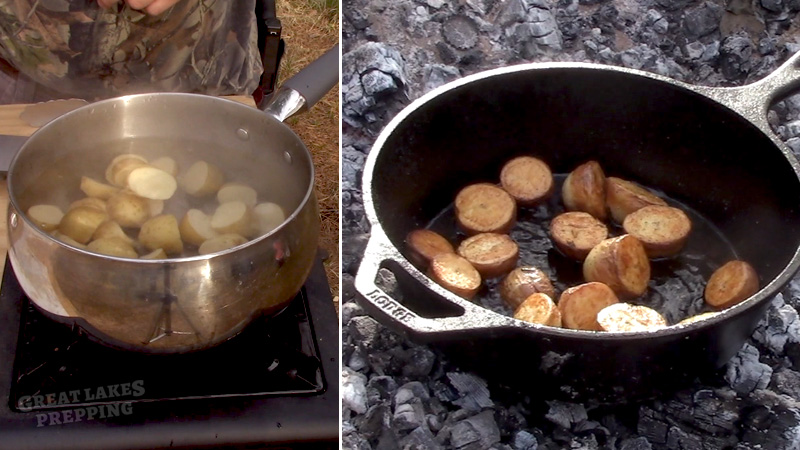
The magic to these crispy potatoes is that they are boiled briefly before getting fried. Carefully drop your halved potatoes into the boiling water and let cook in there at a full boil for 5 minutes. Be sure to give them that solid 5 minutes of full boil, but don’t go longer than that lest you end up with mushy potatoes. After 5 minutes, drain them very thoroughly with a colander or slotted spoon.
While the potatoes are boiling, start heating your oil in a large skillet. Cast iron over the campfire is best, but any large skillet on any adequate heat source will work. Fill the skillet with about 3/4 inch of olive oil and heat it until quite hot. If using fingerlings, you can probably use a little less oil. You just want the oil to come not quite halfway up the potato halves.
A quick note about oil: You may be thinking “Why would you use olive oil for frying potatoes?” Well, we’re not exactly deep-frying here. You can certainly use an oil with a lower smoke point, like Canola, but the flavor is better and lighter with olive oil. You just need to be careful not to cook it so hot that it begins to smoke. Also, because the potatoes were boiled a bit first, they only need to fry long enough to crisp up the outsides.

Place the potato halves face-down in the hot oil. Fry for a couple minutes, then add your salt, pepper, and fresh thyme. Drop a knob of butter into the pan so it melts and blends with the oil. Check the bottoms of a couple potatoes after a few minutes. Once they turn golden-brown, carefully turn each one over.
If desired, season again with a little more salt and pepper. Once the potatoes have a pretty uniformed golden-brown color on all sides, carefully remove them from the skillet and set aside.
Mushroom-Chicken Gravy
Technically-speaking, the gravy is optional. But practically-speaking, why would you deprive yourself?! And it would be an awful shame to let all those delicious juices and drippings go to waste.
Now, classic gravy made from a roasted chicken would usually involve separating the fat from the juice. But we’re in the woods, so a couple liberties have to be taken. Because there isn’t a ton of drippings and juices from these little birds, it won’t hurt anything to leave that juice right there in the pan with the fat and drippings.
I like to make my gravy right there in the Dutch oven, since it’s already hot and I don’t have to dirty another pan. Make sure you have some fresh coals under your oven, or you can just move your oven over to the campfire. You’ll need a constant medium heat, so be mindful of how you position it over a fire pit.
Making this gravy, like any proper poultry gravy, requires a simple roux. If you’re not familiar with that term, a roux is simply a mixture of fat and a thickener. In our case, the fat is chicken fat and the thickener is flour. A great many gravies and sauces start out with a roux of some sort. The fat generally comes from meat or butter. The thickener is usually flour.
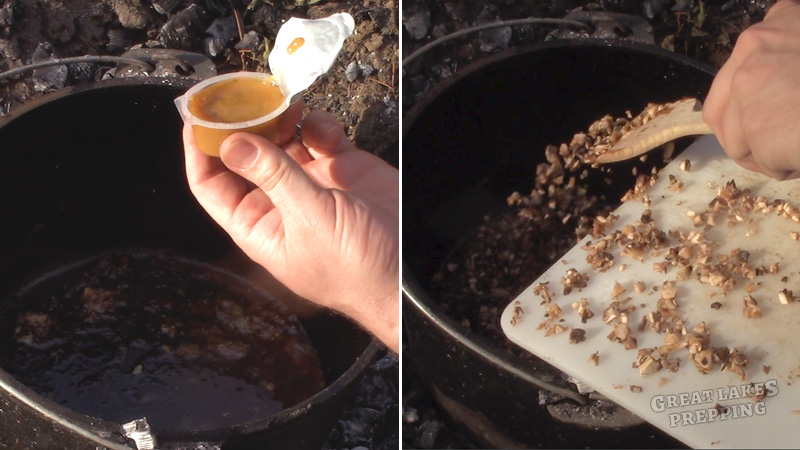
To make the roux for this gravy, I like to add a little more fat. This will give me some more gravy and some more flavor. To do this I use some chicken stock concentrate. The Knorr brand makes a perfectly-handy little pod (their packaging calls them “tubs) of concentrated chicken stock. I just use one of these pods, and stir it into my juice/drippings until it’s melted and well blended.
Heat your fat and drippings until it’s bubbling slightly. Since this is a mushroom gravy, now is the time to get those in the pan. Add your finely-chopped mushrooms and let them cook in that fat for just a couple minutes.
Now it’s time to thicken, thereby creating our roux. Sprinkle in a little bit of flour. Start with about a tablespoon. Stir it very well and pay attention to its consistency. Making gravy takes some practice, and you have to sort of “play it by ear”. Every gravy is slightly different, and that’s ok.
What you’re going for with your roux is a pretty thick, paste-like substance. It should have enough flour that it is not liquidy, but not so much that it’s a mealy, gritty paste. While I tend to “wing it” with my quantity of flour, there is a rule of thumb that says you should have equal parts fat and flour. But since it’s difficult to measure exactly how much fat and juices are in the Dutch oven, I just eyeball it.
Be sure to keep stirring the entire time. Never stop stirring! After the flour is all added, cook the roux for a solid 2-3 minutes (stirring constantly!)
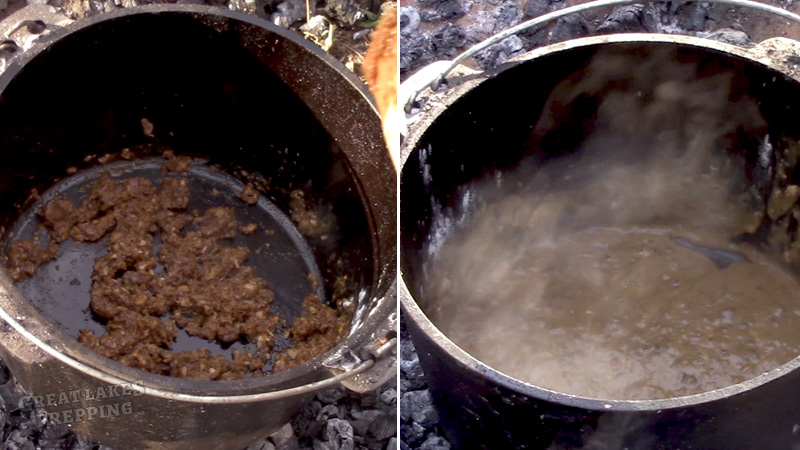
Now that your roux is ready, it’s time to add the liquid. In our case, the liquid is chicken broth. This recipe will use about half a can of chicken broth (I’m talking about the regular 14.5oz cans). This process involves slowly adding liquid, and (you guessed it) stirring constantly. Pour, stir, pour, stir. Each time you pour a little broth in, stir it and let it cook a minute. It will thicken up pretty fast. Once it’s thick, splash some more broth in. Each time it thickens, it will be a little less thick than last time. Eventually, it will remain thin enough that you do not need to add any more liquid. When it’s thin enough to have a gravy-like consistency, it’s done!
Again, gravy is in the eye of the beholder. You’ll stop adding liquid when it reaches a consistency that you like the looks of. If you let it sit awhile on low heat to stay warm, it will still thicken up more. If it gets too thick, you can add just a little bit more broth to thin it out again.
A quick note about seasoning: Normally, you would season your gravy with salt, pepper, or whatever else you like. But because I thoroughly coat my chickens with seasoning, it’s just not necessary. Enough of that seasoning oozes and drips down with the fats and juices, my gravy ends up plenty seasoned. Gravy should be a bit salty, but you definitely don’t want to overdo it. Let the chicken flavor speak for itself for the most part.
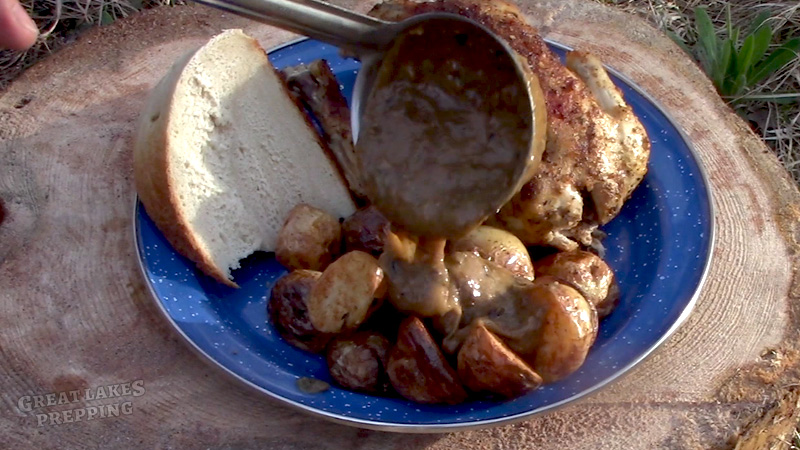
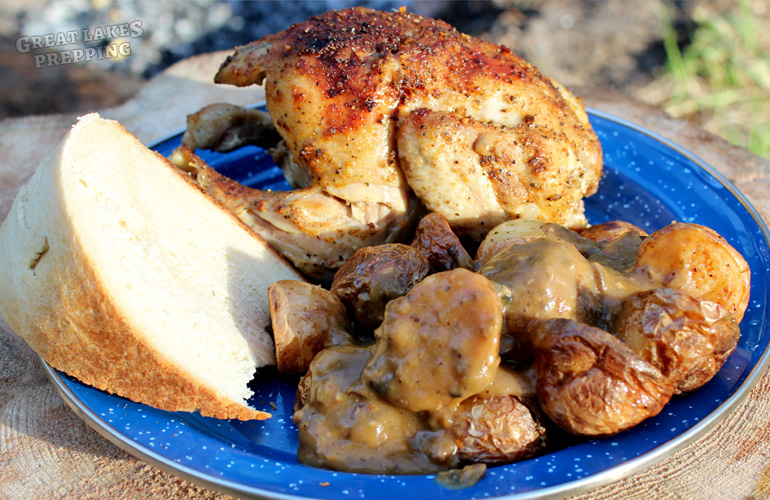
Now it’s time to eat! Plate up a hen and potatoes, and spoon a bunch of that gravy all over the place.
This meal has a lot of steps, and some of them are tricky if you’ve never made a gravy before or if you’ve never baked meat in a Dutch oven. But once you get the hang of it, you will realize a whole world of Dutch oven cooking, as well as sauces and gravies!
Recipe
Dutch Oven Cornish Hens with Crispy Potatoes & Mushroom Gravy
Course: DinnerCuisine: ContinentalDifficulty: Moderate2
servings30
minutes1
hour15
minutesThis delicious and savory chicken recipe can be made in a conventional oven, but this recipe describes the process for baking with a Dutch oven.
Ingredients
- Cornish Hens
2 Cornish hens
Olive oil, about 1/4 cup
3 Tablespoons paprika
1 Tablespoon seasoned salt
1 teaspoon black pepper
1 teaspoon onion powder
1/2 teaspoon garlic powder
1/2 teaspoon dried thyme
- Crispy Potatoes
10-12 baby gold potatoes
Olive oil
2 Tablespoons butter
1 Tablespoon fresh thyme
Salt (to taste)
Black pepper (to taste)
- Mushroom Gravy
Drippings/juices from Cornish hens
1/2 cup finely-chopped mushrooms
3 Tablespoons chicken stock concentrate (or one “tub”)
1/4 cup all-purpose flour
1 – 1 1/2 cups chicken broth
Directions
- Cornish Hens
- Using a Dutch oven with legs (or placed atop a Dutch Oven trivet), preheat to 350-375°F.
- Rub Cornish hens with olive oil, making sure to get all around wings and legs.
- Combine spices in a small bowl and coat hens thoroughly with seasoning mix. You don’t have to use all of the seasoning. Just make sure hens are coated well.
- Using a meat trivet (that goes inside oven), place hens into Dutch oven. Close lid.
- Bake for between 40 and 60 minutes total. Check temperature with meat thermometer in breasts and thighs after about 35 minutes. If it hasn’t reached 165°F, close lid and bake a few more minutes.
- Rotate entire Dutch oven 180 degrees and rotate the lid 180 degrees every 15-20 minutes while cooking to help with even heating.
- Be sure to reapply fresh coals as needed, and be careful not to put too much heat directly under the oven. Heat mostly on top and around the edges underneath the oven.
- Once hens have reached 165°F, remove from oven and set aside. Do not remove the juices and drippings since this will be used for the gravy.
- Crispy Potatoes
- Cut potatoes in half.
- Place potatoes in boiling water for 5 minutes. Then drain thoroughly.
- Heat about 3/4 inch of olive oil in a large skillet, preferably cast iron.
- Once oil is hot, place potato halves face-down into oil.
- After a couple minutes, add butter into skillet.
- Sprinkle with salt and pepper (according to your taste). Add thyme.
- Once bottoms of potatoes are golden brown, turn them over. Sprinkle with more salt and pepper (optional).
- Continue frying until potatoes have a uniform golden-brown color, then remove from oil.
- Mushroom Gravy
- Either keeping the juice/drippings in the Dutch oven or transferring to a separate pan, heat over medium heat.
- Add chicken stock concentrate and cook, stirring frequently, until completely mixed into juice/drippings.
- Stir in chopped mushrooms. Cook 3-5 minutes.
- Gradually add flour, stirring thoroughly. If mixture is too thin, add a little more flour. It should be a thick paste consistency. Cook for 2 minutes after it achieves paste consistency.
- Gradually add chicken broth, a little at a time. Stir constantly and allow to thicken before adding a little more broth. Do this until your gravy is at a good consistency and doesn’t continue to rapidly thicken.
- Spoon over potatoes and/or chicken. If gravy has thickened up too much before serving, you can stir in a very small amount of chicken broth to thin.