How I built a Solar-Power Electricity Backup and Sump Pump System
I’ve spent a lot of time thinking about what problems I’d have if basic services and/or utilities were to suddenly stop working. It’s been a significant driving force behind my inclination towards prepping. I think, “What problems will I have if the tap water stops flowing? What happens if the furnace breaks? What happens if the power goes out?”
While I have contingencies for most things, many of them require me to physically be here at this house. If the power goes out, I can fire up the generator. But what if I’m not at home? What if I’m out of town, on a hunting or camping trip, and a big storm knocks out the power? Well, I can replace the food in the fridge and freezers if I had to. It would be a big loss, but it wouldn’t be the end of the world. There wouldn’t be any permanent consequences if that happened. The sump pump in my basement is another story.
Anybody who owns a home with a sump pump and has lost power during a heavy rainstorm knows how quickly a sump pit can fill up and begin to overflow. If I’m unable to start my generator during a sustained rainstorm in which my main power was knocked out, it wouldn’t take but a couple hours before my basement starts to flood. I’ve got an awful lot of stuff in that basement, not to mention rooms I’ve built. I’d really rather not see all my supplies and hard work get destroyed over the course of a few hours due to my own failure to prepare. To put it mildly, the consequences could be disastrous, and I seriously implore anybody with a sump pump to consider this as well. And even if power doesn’t go out, sump pumps break. Like any appliance, they have a finite functional lifetime, and then they stop working one day.
So the first step is understanding the problem at hand: How can I ensure that my sump pit will not overflow if the municipal power goes out or the pump breaks, and I’m not here to deal with it?
The solution seemed obvious. I needed a backup pump, and a source of power that would not be interrupted by a municipal power outage. There are a few store-bought solutions out there, usually along the lines of a backup pump and battery system that stay plugged into a trickle-charger at all times. This is a solid option, and it’s a rather affordable and effective solution. A large battery can run a small backup pump for quite some time. But I began to fixate on, “Yea, but for how long really?”

So I decided on a solution that involved a pretty large battery and a passive, regular source of power to recharge it. A small solar panel would work as a fine trickle-charger, and does not require or otherwise have anything to do with the main electrical service. Plus, who doesn’t love a backup source of electricity in general! I did not set out to create an entire backup power grid for the house. I simply wanted a system that would keep my sump pit empty, and provide some options for a little 12 volt backup power if needed.
Backup Solar Power Components
There are 3 ingredients needed for a basic 12 volt solar power setup:
- Solar panel
- Battery
- Charge controller
Solar Panel
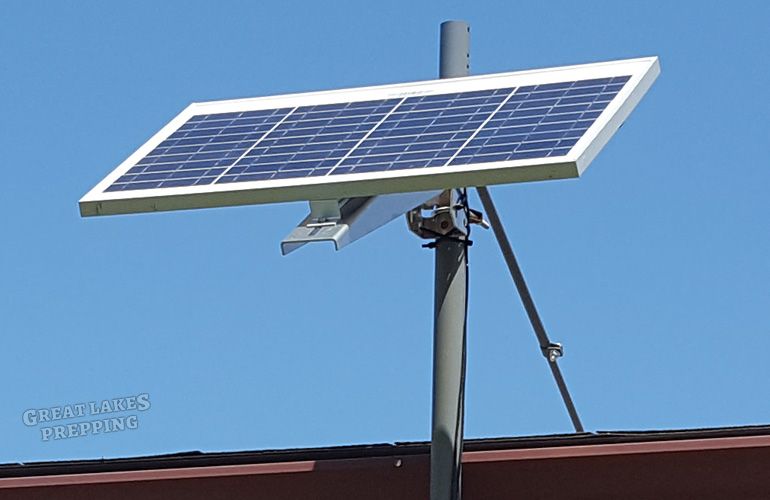
There are countless manufacturers, sizes, and wattage of solar panels available. Since I’m not attempting to power anything directly with solar power, I don’t need something especially large. I went with a 30 watt polycrystalline panel, which is a very common type of solar panel.

There are also numerous mounting options for solar panels. I wanted to attach it to my house somehow, so I wouldn’t need the wires to run across or over any of my yard. So rather than putting a tall post in the ground, I opted for a house mount. I ended up using a satellite dish mounting pole with universal solar panel mounting arm. For some extra stability, I also attached an adjustable support rod from the roof to the top of the mounting pole. This has proved to be incredibly strong and secure, even in severe wind or under heavy snow.
Charge Controller
The charge controller is the brains of the operation. It’s an electronic device that regulates the juice going into the battery. Its main function is to ensure that a solar panel can’t over-charge the battery, and it will only allow my device (backup pump) to operate if the battery has enough of a charge to properly do so. Many modern charge controllers will also have an LED display and options for viewing current voltage and some other information in real-time. Charge controllers also often have electronic protection features, such as overload, short circuit, and reverse polarity protection.
The controller I got actually came as part of a kit with the solar panel. There are lots of kits out there that will include the panel, controller, wiring, and mounting hardware. Some kits are configured in a way that makes it quite easy to add additional panels or even wind turbines.

Battery
Because this is a 12 volt system, I could have used any car battery. A deep-cycle battery is ideal, however, such as a marine battery. I’m sure I didn’t need to, but I went a bit overkill on my battery choice. I got a commercial-grade Duracell AGM Deep-Cycle battery with a 105 amp-hour capacity. These batteries are not particularly inexpensive, and you absolutely don’t need something this hardcore for a simple setup. While a standard deep-cycle boat battery would run a small 12v pump for hours and hours, this Duracell could run it for days or weeks on a single charge. That’s the sort of overkill I enjoy, but it comes at a price. It’s spill-proof, leak-proof, and will charge up to 5 times faster than other types of batteries. I feel at ease knowing that my pump could run basically forever with just a few rays of sunshine every couple days!

Power Inverter
Since my setup is a purely 12-volt system, I don’t need an inverter for anything. However, if I wanted to power devices that would ordinarily plug into the regular power outlets in my house (lamps, radios, etc), I would need one. This device takes the 12v DC and turns it into 120v AC. I may incorporate an inverter at some point in the future, but so far it hasn’t been something I’ve needed.

Backup Sump Pump System
To create my backup sump pump system, I basically needed to incorporate the basic solar power setup with a pump, some electronic controls, and some kind of housing to contain it all. Using a series of float switches and relays, the pump will only turn on if the main sump pump does not. By positioning the backup float switches higher up than the float switch for the main pump, the backup can only ever turn on if the water level rises above the main pump switch. The only practical way this can happen is if the main pump is broken or if there is no power going to it.

Because I have a rather narrow sump pit, I had to figure out a solution to fit the new components while still allowing the main pump to work. I ended up replacing the free-floating water level sensor switch with a simpler, vertical float switch. This saved a lot of room and allowed the new pump and components to fit in there.

I wanted something sturdy to affix the new components to, so I positioned a galvanized pipe vertically into the pit with a flange base to rest upon, and secured the top of the pipe to a ceiling beam above. To this pipe, I attached the backup pump and float switches that control it. These switches are attached to relays on the main control board. Basically, when the water level rises enough to lift both switches, the pump will activate. And when the water level recedes enough to lower both switches, the pump will deactivate. This makes sure that the pump does not turn back off until it has removed several inches of water from the pit.

Cabinet and Control Board
I have seen a lot of photos and videos of people’s home solar power setups, and they often mount everything to a simple piece of plywood that’s screwed to a wall. I wanted to come up with a better version that would contain most of the parts and keep dust away from my components. I couldn’t find a cabinet or commercially-available solution that was quite right, so what other option did I have but to build one myself! I came up with a pretty substantial, rolling cabinet. The main control components are located near the top of the cabinet, and are protected by a large, hinged lid. The panel board itself is also hinged, to allow easy access to the underside for wiring purposes. Below, there are two cupboard-style doors for accessing the area in which the battery is stored.


This entire piece of furniture is much larger and heavy-duty than it needed to be for my current setup. But I wanted to build something that would accommodate a future expansion. The entire setup is built in such a way that adding more panels (or wind turbines) and more batteries would be a pretty simple affair. Accordingly, I wanted a cabinet that would hold everything, including stuff I haven’t even thought of yet!
The components of my control board at this time are:
- Charge controller
- Relays
- Volt meter
- USB Charge Ports
- 12v lighter outlet

Since I went through all the trouble to put this elaborate thing together, I figured I might as well add a couple little extras in there. It turns out I didn’t really need the volt meter, since my charge controller already has those display features. The USB ports are in case I need to charge a cell phone or similar device, and the 12v lighter outlet was more of a “Why not?” If I need to charge my ham radio go-box, I could easily use this.

That’s about it. Most of the time spent on this project, aside from building the cabinet, was figuring out just how I wanted to attach the various components, run the wires, and mount the panel. The switches and relays are a relatively simple configuration, as was wiring the panel. As far as cost, the total for everything came to just under $500, but it could have been substantially less if I went with a different battery. In my mind, that’s a small price to pay for the peace of mind I feel when I’m out of town, knowing that there’s practically zero chance I’ll return to a flood-ravaged home.