How to Store Rice in Mason Jars for Long-Term Storage
Buying rice in bulk from stores like Costco or Sam’s Club is far cheaper per pound than buying small bags or boxes from a regular grocery store. With many bulk items, it’s difficult to use it all up before it goes bad and long-term storage options may not exist. But for many dry items, long term storage is possible and rather easy.
Luckily, rice can be stored for a very long time if done properly. If kept away from oxygen and moisture, rice can be kept and remain perfectly safe and testy for years or even decades. I am currently still using rice from a large order that I stored many, many years ago.
There are two common methods for preserving dry rice for very long term storage:
- Mylar bags and plastic buckets – Rice is sealed in large mylar bags with the use of oxygen absorber packets, then put into 5-gallon buckets. Basically, the Mylar bag protects the rice and the bucket protects the Mylar bag (from damage, pests, etc).
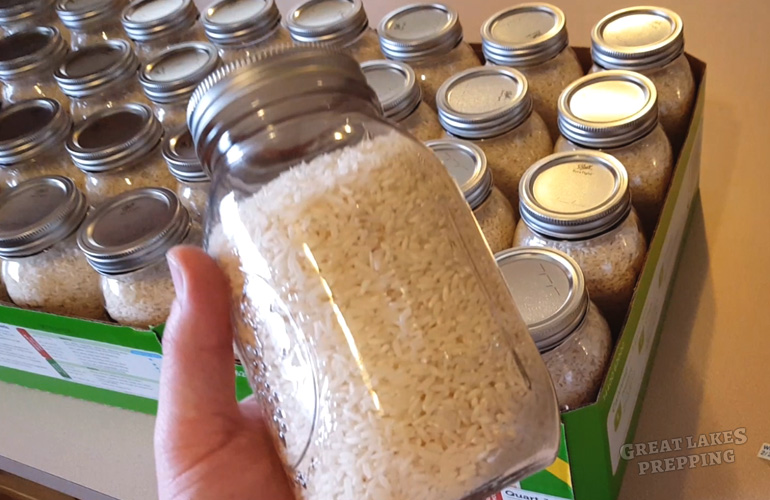
- Mason jars – Rice is placed in mason jars, and oxygen is removed with either oxygen absorber packets or a vacuum-sealing machine (like FoodSaver).
This post is all about the second option. I prefer to store rice in mason jars for a couple reasons. It’s more work to get started, but I like having my rice and other dry goods divvied up into smaller quantities. If I want to eat some rice and it’s all in massive 5-gallon buckets, I have to break the seal and ruin the Mylar bag just to get a couple cups of rice. Now the clock is ticking to finish the rest of that rice now that I’ve exposed it to the elements by breaking the seal. With mason jars, I can un-seal just a few cups at a time, leaving the rest of my stash undisturbed.
Now, if I had a large family or group for whom I was stocking rice, larger quantities would make more sense. But for a small operation like mine, I’ll stick with mason jars.
Materials Used
- Mason Jars (Cheapest at Walmart, Target, or thrift stores/garage sales)
- Jar Funnel
- FoodSaver Vacuum-Sealing Machine
- Jar Attachment (regular-mouth)
On to the “sealing”. There’s nothing wrong with using oxygen absorber packets, but I prefer vacuum-sealing for a couple reasons. First, I don’t need to keep buying the oxygen absorbers and worrying about them going bad (being exposed to oxygen somehow, thereby ruining them). After my initial investment of a FoodSaver machine (which I already had anyway for storing food in the vacuum-sealed freezer bags), all I need to do is hook it up and let it do its thing. Second, oxygen absorbers remove only oxygen. They do not remove “air”. The air we exist in is not purely oxygen. Oxygen absorber packets remove only oxygen. While this is the important part, as oxygen is what spoils food, it makes me feel better that my vacuum sealing machine is removing everything. And by sucking all air out of the jar, it seals the lid in place. I can easily tell if the vacuum has been broken on all my jars by whether or not the center of the lid is popped up (and therefore can be freely pressed down). With oxy absorbers, this will not be the case. There is no vacuum, and the lid is not “sealed”.
Now that I’ve sold you on the merits of vacuum-sealing dry goods in mason jars, on to the step by step directions!
Step 1: Freeze your rice
I get a LOT of questions about this step on the Great Lakes Prepping YouTube channel, and I will admit that it may not be 100% necessary. I learned to always freeze your grains before long-term storage to prevent any weevil or other insect eggs from hatching later on. If you’ve ever had an old bag of flour in your cupboard that suddenly because infested with tiny bugs, those bugs hatched from eggs that were already there. They were in your flour from the day you purchased it. But freezing it destroys the eggs and prevents this from ever being an issue. Now, rice isn’t exactly the same as flour. But it’s still considered a “grain” in common terminology, so I freeze it. If you don’t freeze it, it will probably be fine. But it hurts nothing to do it, and I have the space and time… so why not?

If you do choose to freeze your rice, here’s the important part: Make sure to put your rice in a watertight container before freezing. This is to prevent condensation from forming all over your rice after you take it out of the freezer. The large bags that bulk rice comes in are not watertight or airtight. For this reason, I dump them into a five gallon bucket, close the lid tightly, and freeze the entire bucket. I freeze it for no less than 2 full days, and then I allow it to come fully back to room temperature before removing the lid. Again, preventing condensation is key here. You don’t want moisture all over the rice you’re about to seal in a jar for 20 years.

Step 2: Prepare your jars
Clean jars are happy jars. It’s always important to start with clean jars before storing food in them. Now we all know that when canning wet foods with hot water bath or pressure canning, you must basically sterilize your jar with boiling water or steam. I’m not quite as strict with dry canning. I want very clean jars, but I don’t go out of my way to ensure that they’re as sterile as an operating room. I hear questions about this step somewhat frequently as well. “Do you sanitize the jars first?” Yes, I sanitize them. No, I don’t “sterilize” them. Put them through the dishwasher. If they aren’t brand new jars and you’re reusing older ones, make sure they’re scrubbed spotlessly clean of any old food. Dish soap and water does the trick for sanitizing.
And, of course, make sure your jars, lids, and rings are all bone dry before putting a single grain of rice in them!
I like to line up all my jars in a row (or several rows) to get ready for filling. You can do some rough math and figure out approximately how many jars you are going to need for your bag of rice.

Step 3: Fill the Jars
Using a basic mason jar funnel and a scoop of some sort, I just get to filling. Since my rice is already in five gallon buckets from the freezing step, it’s pretty easy to dip a scoop in there repeatedly and quickly. I usually use a large measuring cup, but any sort of cup, scoop, or ladle will work just fine.
Next, just start filling. Fill the jars up to the bottom of the funnel. Then tamp the jar a bit on the counter (using a towel or something to soften the impact). Just some gentle thumping on the counter will settle the rice a bit so you can fit a little more in. When you’re done, be sure the level of the rice doesn’t come up into the funnel. Having it come up just to the bottom edge of the funnel is recommended.
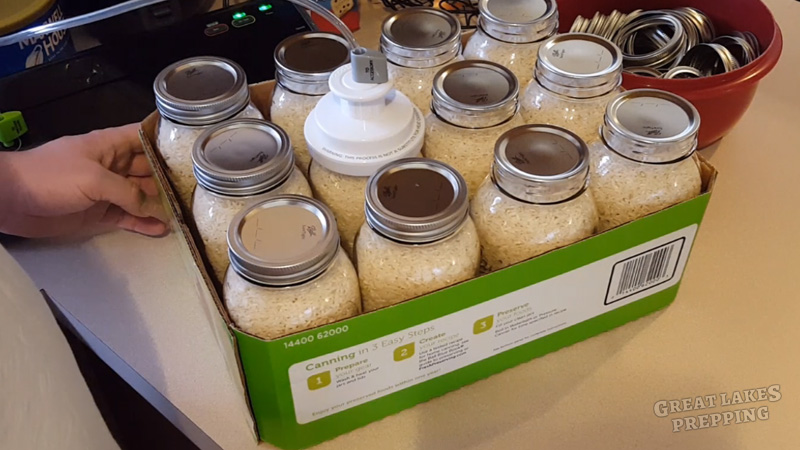
Step 4: Seal the Jars
Once all your jars are filled with rice, it’s time to place the lids on. Set the lids on each jar, centering them as best you can. Do not screw the rings over the lid; only place the lids on.
You will be using the accessory hose for your vacuum-sealing machine. You will also need the jar-sealing attachment, which generally must be purchased separately from FoodSaver machines (and similar). The machines do usually come with the accessory hose. Jar sealer attachments are available in both regular mouth and wide mouth sizes. You can use them on pint or quart jars, though I have only ever done regular-mouth quart jars.

Attach the end of the hose that is color-coded to match the accessory port to the machine. Then attach the other end of the hose to the jar sealing attachment. Carefully place the jar attachment over the top of a jar, ensuring that you do not nudge the lid out of place. You may need to do a slow and slight twisting motion with the attachment to seat it properly over the jar. Make sure that the attachment is pressed as far down as it can go.
Once the jar attachment is seated over the jar and lid, press the “vacuum” button on your machine. It will take several seconds to remove all the air, and you will likely hear a difference in sound pitch as the machine is close to being finished. It will turn off when all the air is gone.
Since you don’t need to wait for it to heat-seal a bag, you can remove the jar attachment from your jar as soon as the vacuum motor stops.
Something you must know before trying to remove the jar attachment from your jar: You must pull out the hose from the jar attachment first. If you do not, suction holding the attachment to your jar will make it basically impossible to remove. You have to do this for each and every jar. Once you pull the air house out of your jar attachment, gently twist it and lift it up and off the jar. Once in awhile, the rubber gasket ring may fall out of the jar attachment as you do this. Not a problem, just carefully press it back into place within the attachment.
Step 5: Label and Store
Now just label your jars. You can use a label maker or just a Sharpie. Write today’s date on the lid so you will always know how long your rice has been stored, no matter how many years have passed.
Store your jars in a relatively cool and dry place. Just like canned goods, you don’t want heat, light, water, or air getting to your food. The jars take care of air and water. Since they’re transparent, you should put them somewhere dark to keep out light. For heat, it’s also up to you to store them someplace where they won’t experience excessive temperatures. As for freezing, this won’t damage your rice but it could damage your jar or their rubber gasket in the lid.
Something important to keep in mind: It’s not recommended that you store your jars with the metal rings in place. If you have properly vacuum sealed the jars, your lids will not come off without deliberate effort. There are two main reasons why it’s not advisable to keep the rings on your jars indefinitely:
- Rust – It’s possible for surface rust to form on your lids over time, just from the humidity in the air. If rust were to form in the space between your ring and lid, this could lead to damaging the integrity of the lead or making it very difficult to remove the ring later on.
- False seal – Once in awhile you may encounter a lid that does not hold it’s steal forever. For whatever reason, be it a faulty lid or bad sealing from the beginning, it’s possible that your lid will un-seal. This could happen an hour after sealing, or a year after. While you could identify this by trying to press down the center of the lid with your finger, it’s very easily noticeable if your lid is unsealed when there is no ring. The whole lid will just be sitting loosely atop the jar.
I used to be apprehensive about trusting the seal of the jars to hold while transporting the jars, and I would put the rings on even just to carry the jars down to the basement. I have since come to accept that the lids are not going anywhere if sealed properly, so now I don’t bother with the rings at all.
So that’s about it. It’s a straightforward process as long as you have the right tools for the job. After sealing a few jars, you’ll have the magic touch and you’ll be sealing all sorts of things. Dehydrated vegetables, beans, pasta, sugar… the possibilities are endless!